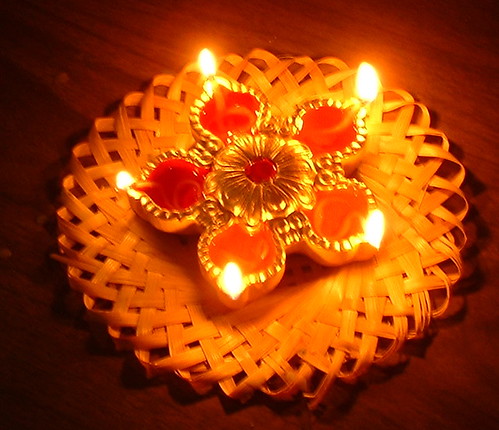
Tomorrow Indian homes everywhere will celebrate "Diwali", the festival of lights...
This is a traditional earthenware diya that I lit for diwali...I wish everyone everywhere a wonderful festive season and a year filled with peace and happiness, and good food and good friends...everything that makes for a rich life.
▼
Monday, October 31, 2005
Sunday, October 30, 2005
H is for HIRAVI CHUTNEY
This article is part of a special series called "The A-Z of Marathi food". India is the land of diversity. Each of the 28 states in India has a unique cuisine but the Indian food served in restaurants represents only a tiny fraction of our culinary heritage. I come from the western Indian state of Maharashtra. Capital: Bombay (Mumbai). Population: 96 million (only 11 countries in the world have a population higher than Maharashtra). Language: Marathi. Traditional Marathi food is earthy and humble, diverse and very tasty. It also remains relatively unknown to non-marathis. Its time to change that. I invite you to join me on an alphabetical culinary tour of my state. We will go through the letters A to Z and make a dish with each letter to show-case Marathi cuisine.
H is for Hirvi Chutney.
This week finds us at the letter "H"...not the most inspiring letter for Marathi food. It does stand for a few delicious things though, such as halwa, that lovely dessert found in most Indian and Mid-Eastern cuisines. The most common halwas in Marathi food are doodhi halwa (made with white gourd, a member of the squash family) and gajar (carrot) halwa. Being Diwali, it is the season of halwa but this weekend turned out to be too busy work-wise so it will have to wait.
The other "H" word that I love is a green legume called harbara. These look like miniature bright green chickpeas. Fresh harbara is quite a seasonal delicacy in my home-town: you buy it in bunches, still within its pod. After shelling it, the fresh harbara can be roasted and sprinkled with salt, red chilli powder and lemon juice to give a delicious snack called "chatpate". Dried harbara is available in Indian grocery stores. I love making harbara chaat by boiling the harbara and tossing it with some minced onion, tomato, boiled potato, chillies, salt and lemon juice. What a tasty and healthy snack.
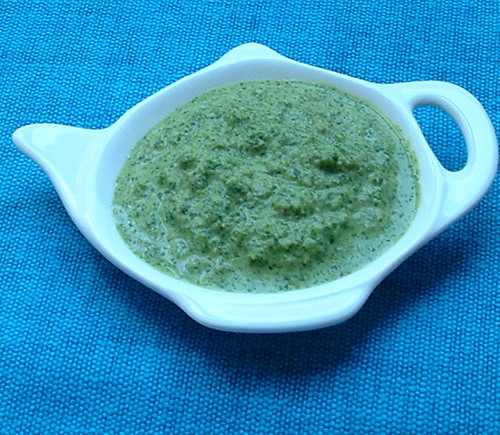
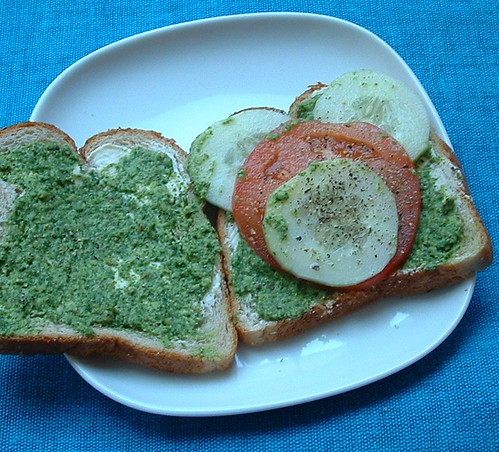
"H" also stands for a color: Hirava meaning green. So today I decided to make my favorite "hirava" food: Hiravi chutney or green chutney. This is a very versatile chutney that can be put together in minutes: a simple blend of hot green chillies and fresh herbs (which also happen to be green). Bombay is street-food paradise, and a favorite street food is sandwiches made with this green chutney, as we shall make today. My mom calls them "Raju sandwich-walla sandwiches"...I suppose she knew a vendor named Raju who made these! These sandwiches are really the healthiest of street foods, being
a) not fried, which is a miracle in the street food world
b) full of fresh raw veggies.
Hiravi (Green) Chutney
Ingredients:
2 cups packed fresh cilantro
1 cup packed fresh mint leaves
1/4 cup roughly chopped onion
2 green chillies
2 tbsp roasted peanuts
1 tbsp yogurt or sour cream
1 tsp cumin powder
salt to taste
Method: Place all ingredients in a food processor and blend with a little water to get a thick chutney. That's it!
To make sandwiches, spread softened butter, then a layer of chutney on a slice of bread. Top with thinly sliced tomato and cucumber, then season with salt and pepper. Cover with another slice, also spread with butter and chutney. This is delicious lunch-box or picnic food. The butter usually keeps the bread from getting soggy.
Variations on the sandwich:
a) Try other veggies, such as beets, radishes and boiled potato.
b) Add a slice of cheese.
c) Grill the sandwich. Mmm :)
That concludes the letter "H". See you next week with "I"! As usual, suggestions are much-appreciated!
Weekend Dog Blogging
Dale is playing in the 59th street dog run in Manhattan. He loves going there on evenings and weekends and hanging out with his buddies. This dog run is at the eastern edge of the city, the water is the "East River" and you can see Roosevelt Island beyond it. Beyond Roosevelt is Brooklyn and Queens. New York City adores its canine population and there are many dog runs sprinkled throughout the city.
Check out all the pooches at Sweetnicks.
Sunday, October 23, 2005
IMBB #20: The Souffle Also Rises
This month, Kitchen Chick has set us a challenge...to make a souffle! In the classic dishes yearbook, I think the souffle traditionally wins the title "Most likely to collapse and ruin your nice dinner party" so it is a dish many cooks fear to make. I for one can't even remember if I have ever eaten a souffle. But the idea of a delicate concoction of eggs and cheese, puffy and golden to be savoured right after it comes out of the oven...so tempting, right?
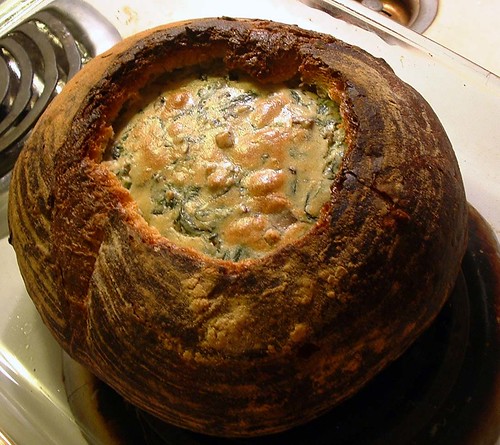
First things first: sweet or savoury? I will take savoury every time. Next issue: choosing a recipe. I found a whole bunch of recipes on BBC food that I liked. But again, I don't own a souffle dish or ramekins. It was a choice between running to Bed, Bath and Beyond to buy a souffle dish, or making do with a shallow gratin dish. Then I came upon this recipe on BBC food that calls for baking the souffle in a hollow bread loaf! Perfect: an edible souffle dish. I modified the recipe to include mushrooms and spinach, because I love the combination of mushrooms, spinach and cheese; and also to get some vegetables in.
Bread Bowl Souffle
Ingredients:
1 country loaf (I used a country white boule from Balthazar)
1 small Boursin cheese with garlic and herbs
2 eggs, separated
1 cup chopped cremini mushrooms
1/2 bunch fresh spinach
1 tbsp butter
salt
freshly ground black pepper
Method:
1. Preheat the oven to 425 degrees F.
2. Hollow out the loaf of bread. Save the hollowed-out bits for another use.
3. Rinse the spinach and place this wet spinach in a microwave-safe bowl. Microwave on high for 2 minutes. Press out all the water and chop the spinach.
4. In a skillet, heat the butter and saute the spinach and mushrooms for 2 minutes. Season with salt and pepper.
5. In a bowl, break up the cheese into little bits. Add the mushroom-spinach mixture and the egg yolks and mix well.
6. Beat the egg whites to soft peak.
7. Gently fold whites into the cheese-egg yolk-vegetable mixture.
8. Pour the mixture into the hollowed loaf.
9. Bake in the oven for 20 minutes until the soufflé is cooked.
The verdict: We loved it! I still have no idea if the souffle rose as much as it could have. It was puffy but not outrageously so :) The souffle never deflated which makes me think it did not rise too well to begin with. The baking toasted the bread, while the mixture inside was creamy, fluffy and delicious. The combination was so good together. I will make this dish again and again! Next time I might add some nutmeg for the extra flavor. Thanks Kitchen Chick, you really made me expand my culinary horizons!
Tagged with: IMBB # 20 + Souffle
Saturday, October 22, 2005
G is for GHARGE
This article is part of a special series called "The A-Z of Marathi food". India is the land of diversity. Each of the 28 states in India has a unique cuisine but the Indian food served in restaurants represents only a tiny fraction of our culinary heritage. I come from the western Indian state of Maharashtra. Capital: Bombay (Mumbai). Population: 96 million (only 11 countries in the world have a population higher than Maharashtra). Language: Marathi. Traditional Marathi food is earthy and humble, diverse and very tasty. It also remains relatively unknown to non-marathis. Its time to change that. I invite you to join me on an alphabetical culinary tour of my state. We will go through the letters A to Z and make a dish with each letter to show-case Marathi cuisine.
G is for Gharge.
G is an important letter: it stands for two staples of the Marathi diet. The first is Gahu or wheat. As far as diet staples are concerned, India can be divided more or less horizontally across it's middle: the upper half or Northern India eats wheat as its staple carb, refected in the wonderful North Indian breads such as puris, parathas and naans. The Southern half is the rice bowl of India, with its famous flavored rice dishes and idlis and dosas made with rice flour. Maharashtra is right in the middle: neither Northern nor Southern, and the Marathi diet relies almost equally on wheat and rice. The gharge we make today will contain both wheat and rice components.
The second important "G" is gul or jaggery. Traveling through many parts of Maharastra, one can see gracefully swaying fields of sugarcane. Much of the sugarcane is sent off to refineries for the production of processed white cane sugar, but another important product is jaggery, made in small-scale industries called "gurhal". Jaggery is a smart choice for a sweetener...it is unprocessed and rich in many minerals, including iron. Jaggery also has a wonderful deep taste of its own, much unlike the stark sweetness of refined sugar. We will use plenty of jaggery when we make the gharge today.
"G" also stands for two ever-popular vegetables in Marathi food: gajar or carrot and guvar or cluster beans, a type of bean with a subtle bitter aftertaste, wonderful for making stir-fries.
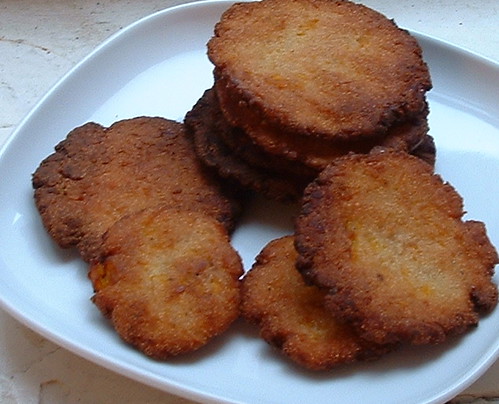
The gharge or sweet pumpkin puris are so appropriate to make in October! The markets are overflowing with pumpkins of all sizes. In India, I have never seen whole pumpkins being sold. Vendors cut them into reasonably-size wedges. Pumpkin is very popular and is used in a variety of dishes, mostly savoury. But the gharge I am making today are a sweet tea-time snack.
This was my first time buying and cooking pumpkin (yes, I know, I have so much to learn!). I was at Union Square yesterday, a neighborhood of Manhattan beloved for its great Farmers Market. I picked up a pretty small pumpkin for this dish. My ambitious plan was to use the flesh for this dish and to try and carve a little jack o' lantern with the shell, and to make toasted pumpkin seeds. The first surprise came when I tried to cut the pumpkin open. This stuff is hard to cut, but I managed to lop the top off the pumpkin. Next time: scooping out the seeds, along with all the fibers. This was easy and I saved the seeds to roast. Then I wanted to scoop the flesh out but that turned out to be quite impossible. I finally had to hack the pumpkin into pieces (bye bye jack o' lantern) and use a knife to remove the skin from each section before chopping up the flesh.
So now my theory is that carving pumpkins are huge and thus contain enough flesh to be actually scooped out. The one I bought was probably too "baby" to both eat and carve. Am I right? Also people must be using power tools to carve these pumpkins! I know my knife ain't going to work. On to the recipe...
Gharge (Sweet Pumpkin Puris)
(adapted from the book "Lajawab Mishtann" by Sudha Maydev)
Makes 12-16 medium-sized gharge
Ingredients:
1 cups grated/minced pumpkin
1/2 cup rice flour
1/2 cup rava (cream of wheat)
1/3 cup atta (Indian-style whole wheat flour)
1 cup grated jaggery
1/2 tsp cardamom powder
1/4 tsp salt
1 tbsp warmed vegetable oil
Oil for frying
Method:
1. Combine grated pumpkin and jaggery in a saucepan and cook together on medium heat till pumpkin is cooked and the mixture is a thick sticky mass.
2. To the warm mixture, add the warmed oil, cardamom powder, salt and all three flours. Knead well.
3. Make small golf-ball sized balls of this mixture. Pat each ball into a circle (puri-shaped). This can be done easily on a greased plastic sheet. Mine turned out pretty rustic-looking :) which is to say, all kinds of odd sizes. But it can be done more neatly.
4. Deep fry the gharges till golden-brown in about 1 inch of oil.
5. Drain on paper towels. When gharges are cool, store them in an airtight container.
The verdict: these are easy to make and quite delicious! The outside of the gharge is crisp and the inside is quite chewy. I enjoyed the deep taste of the pumpkin and jaggery. It is a healthy and filling snack. I also enjoyed my first experience cooking pumpkin from scratch.
Two important notes:
1. When frying these, I noticed that sometimes there would be a "pop" in the oil, I think this is due to the fact that the dough has tiny pockets of water from the pumpkin mixture. Do be a little careful while frying.
2. I tried making some, and while they looked fine, they became really hard and a torture to eat. So I would recommend the deep frying. If done properly, very little oil gets absorbed.
Next week we look at "H". This is quite a difficult letter and I would really appreciate some ideas!
Weekend Dog Blogging #6
Dale is just hangin' out, staying dry and warm on yet another wet chilly weekend. Check out Dale and his other pals having fun with Sweetnicks.
Friday, October 21, 2005
SHF #13: Black Forest Cake
This month, the food-blogging community is celebrating the first anniversary of that wonderful event called Sugar High Friday (SHF) , first started by the The Domestic Goddess. One Friday of every month, bloggers make a dessert based on a common theme. Unlike most people, I don't have much of a sweet tooth...I enjoy small bites of dessert once in a while, but my sugar threshold is low. So when I was making my recipe index a few days ago, I was startled to see that the dessert category had the longest list of recipes. I have to credit SHF with expanding my horizons and getting me to try many wonderful dessert recipes. Every time I make an entry for SHF, I end up with a big delicious dessert, and always invite some friends over to share it with me. So each SHF entry is also associated with the different people who came and shared those sweet moments. Home-made desserts are so much better than what I did before, which was buying a cheesecake or pie from the local bakery. So thank you Jennifer, for thinking of this event!
This month, SHF has come full circle with a theme that is probably the most popular flavor for dessert: Chocolate, chosen by our hostess Lovescool.
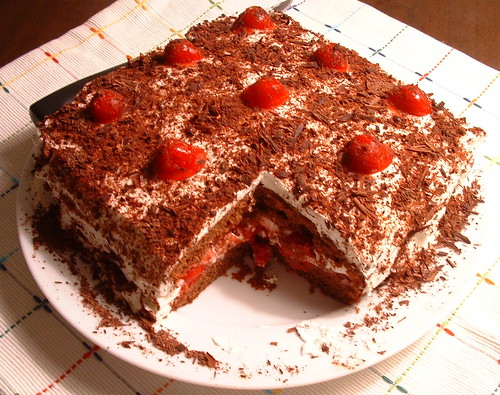
I do have quite a list of chocolate desserts that I enjoy: brownies a la mode (called "Ebony and Ivory" by a restaurant in Bombay), chocolate mousse (the best I have ever eaten was made by my Swiss boss at his holiday party), or hand-dipped chocolates (my grandma made these when I was a kid). But I finally decided to make black forest cake. In my opinion, this is hands-down the favorite cake in my part of India, a pastry that is much beloved at all celebrations. Black forest cake is a German creation of dark chocolate cake, filled with cherries and cream, topped with cherries and cream and blanketed with chocolate shavings. Is that decadent enough for ya? :)
For a recipe, I turned to the internet. My constraints were (a) The only cake-baking dish I own is my standard pyrex 8 inch X 8 inch dish (b) I don't own a kitchen scale so I had a find a recipe with cup measures and not weight measures. I finally adapted the cake from this Chocolate Ganache Cake recipe from Epicurious, and the general black forest method from this Black Forest Gateau recipe from BBC food.
For all the fancy, expensive pastry that I have always known black forest cake to be, it was really easy to put together. There are quite a few ingredients and quite a few steps, but it all goes very quickly once you get started. The final taste was delicious and everyone who tried some loved it. The hardest part for me was making the chocolate shavings. The traditional way is to use cold chocolate and a vegetable peeler. When I tried that, all I got was a fine chocolate powder. When I stood in the kitchen, panicking at a bar of chocolate rapidly melting, it was V who rescued me by suggesting that I use a mandoline. It worked a lot better...although I still did not get those gorgeous chocolate curls, I ended up with large-enough shavings to be happy. This mandoline is such a great kitchen gadget. My Mom bought it for me, for the princely sum of Indian rupees (Rs.) 66, less than US $0.50. A bargain if ever I saw one.
The one disappointment was the canned cherries. I had never used canned cherry pie filling before, and I was dismayed when I saw the gummy red syrup with cherries floating about. Next time I will make the filling myself. The canned filling did taste OK in the context of the rest of the cake, but it's too artificial for words with that lurid red color.
Black Forest Cake
Ingredients
For cake:
1/3 cup boiling water
1/4 cup unsweetened cocoa powder
1 teaspoon instant-espresso powder
1/4 cup whole milk
1 teaspoon vanilla extract
1 cup all-purpose flour
1 tsp baking soda
1/4 teaspoon salt
1 stick (1/2 cup) unsalted butter, softened
1 cups packed dark brown sugar
2 large eggs
For filling and topping:
2 cups heavy cream
1/2 tsp vanilla extract
2 tbsp powder sugar
1 can cherry pie filling
1/2 cup cherry cordial/ liqueur/ kirsch (or 1/2 cup sugar water)
1 bar good quality bittersweet chocolate
Method
1. Make cake layers:
a) Preheat oven to 350°F. Line 8 inch square baking dish with parchment paper and butter and flour it.
b) Whisk together water, cocoa, and espresso powder until smooth, then whisk in milk and vanilla.
c) Sift together flour, baking soda, and salt.
d) Beat together butter and brown sugar in a large bowl with an electric mixer at high speed until fluffy, then add eggs 1 at a time, beating well after each addition. Add flour mixture and cocoa mixture in batches, beginning and ending with flour and mixing at low speed until just combined.
e) Pour batter into baking dish, bake for 20-25 minutes till tester comes clean. Cool completely. Set aside.
2. Whip the heavy cream till it forms soft peaks. An electric beater does this job quickly. Fold in 1/2 tsp vanilla extract and 2 tbsp powder sugar and set aside.
3. Open the can of cherry filling and drain and reserve the syrup. Set cherries in a bowl. Mix 1/2 cup of the syrup with 1/2 cup of the alcohol or sugar water.
4. Slice the cake in half horizontally so as to get two layers. I was afraid of doing this with the whole 8X8 cake, so I sliced the cake half length-wise first, then made layers with each half. In the end, the top gets frosted so the seam is not seen in the end. On a cutting board, set all the layers cut-side up and drizzle with syrup-alcohol mixture so that the cake gets moist. Let it steep for 10 minutes.
5. To assemble, place the lower layer on a cake dish. Spread with the canned cherries, saving a few for decoration. Spread with 1/3 of the cream filling. Lay the top layer over this. Spread the top layer and sides of the cake with the rest of the cream mixture. Decorate with some cherries and sprinkle on the chocolate shavings liberally.
6. Chill for a few hours, then serve!
Wishing everyone a happy Friday and a sweet weekend ahead. Thanks for hosting, Lovescool!
Wednesday, October 19, 2005
Blog Party #3: Big Game FIESTA
It's time for yet another blog party, and this time our charming hostess Stephanie has challenged us to come up with little bites and drinks for the big-game night. Now, to put it mildly, I am not athletic. I routinely take the elevator down one floor. I have yet to open a jar of pasta sauce without help. My idea of sport is to cook a dinner for twenty. In mid-August, I ran a 5K race, and for days afterwards, I was sore, discovering muscles I did not know existed. My indifference to sports is matched only by my hatred for watching them on TV! Sunday nights find me ranting and raving every time that John Madden says something like "Oh, he hit that like a real man" (??!!). BUT even I have to admit that the saving grace of sports is the food that gets served at sporting-event parties! I love those spicy dips, bags of chips, the nachos, everything. So I'm looking forward to this party after all.
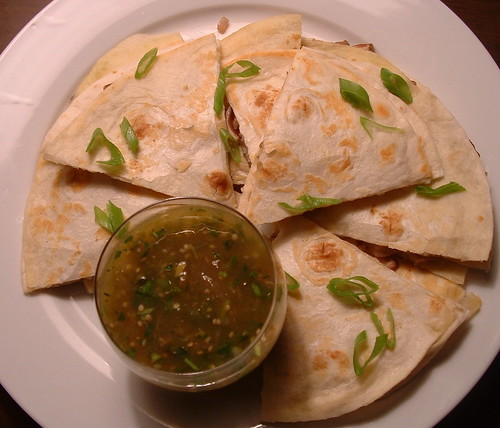
Today I have put together a big-game Fiesta: Wild mushroom quesadillas served with fresh home-made salsa verde, and some spicy jalapeno poppers.
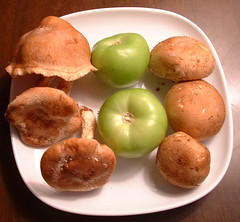
Quesadillas (pronounced "kay-suh-dee-yaas") are one of my favorite appetizers. In their simplest form, they consist of two flour tortillas with some grated cheese in between, heated through till the cheese melts and becomes the glue holding together the tortillas. Of course this basic quesadilla is easily jazzed up with all kinds of delicious fillings. At the local Saturday Farmer's Market where I shop, there is a stall from upstate NY that sells the most amazing produce. I had been eyeing their wild mushrooms for weeks and decided that I would try using them in a quesadilla. For a sauce to dip them into, I decided on a piquant salsa verde with fresh tomatillos from a local Mexican grocery. It was my first time cooking with shitaake mushrooms and tomatillos! Here is a picture of these unusual (for me!) ingredients: Left to right...shitaake mushrooms, tomatillos and the more mainstream cremini (baby bella) mushrooms.
Lets start with these simple tasty quesadillas. The filling can easily be made ahead of time, as can the salsa verde.
Wild Mushroom Quesadillas
(makes 4 quesadillas)
Ingredients:
4 flour tortillas
2 cups Monterey-Jack cheese (loosely packed)
6 cremini mushrooms, sliced fine
6 shitaake mushrooms, sliced fine
2 tbsp minced onions
1/2 tbsp butter
1 tbsp extra virgin olive oil
salt and pepper to taste
Method:
1. Make the filling: Heat olive oil and butter in a skillet. Saute the onions till transluscent. Add the mushrooms and saute till tender (2-3 minutes). Season with salt and pepper. Set aside.
2. Assemble the quesadillas: Place a flour tortilla on a flat surface. Scatter 1/4 cup of cheese all over. Spread a 1/4 of the mushroom mixture. These mushrooms are full of flavor so a little goes a long way. Scatter another 1/4 cup of cheese over the mushrooms. Press another tortilla over this. Place the quesadilla carefully in a heated skillet and toast well on each side till cheese is melted. Cut the quesadillas into wedges and serve with salsa verde.
I served these with this fresh salsa. The combination was just too good. I think this is one of the tastiest dishes I have ever cooked. Ever. The taste was explosive. Never again will I buy bottled salsa verde.
Salsa Verde
(adapted from Mollie Katzen's "The Enchanted Broccoli Forest")
Makes 2 cups
Ingredients
6 tomatillos, roughly chopped
1 small onion, roughly chopped
3 large cloves garlic, minced
1 anaheim/poblano/any other hot chili pepper, minced
1/2 tsp cayenne pepper/red chilli powder
1 tsp salt
2 tbsp minced fresh cilantro
2 tbsp minced fresh basil
2 scallions/ spring onions, minced (green and white parts)
Method:
1. In a saucepan, combine 1 cup water and all ingredients from tomatillos to salt. Bring to a boil, cover partially and simmer for 10 minutes. Let it cool a little.
2. Process this sauce in a blender/food processor/hand blender to get it slightly smooth (you can leave it as chunky as you like).
3. Mix in the fresh herbs and scallions. Taste and adjust salt if necessary.
A note on substitutions: any mixture of mushrooms could be used for a similar flavor, and green tomatoes would nicely in place of the tomatillos.
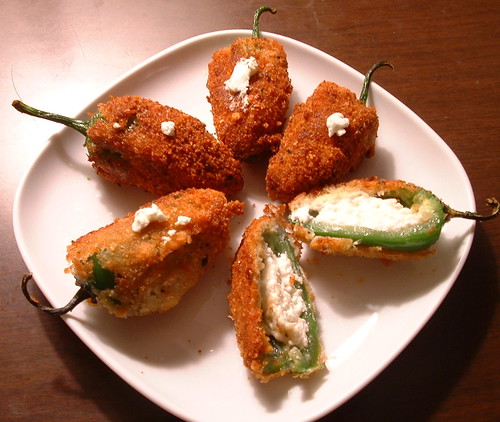
The next dish I am serving up is some extra-hot jalapeno poppers. I ate some amazing poppers a long time ago at a comedy club (of all places), and have been experimenting with them off and on. This time I decided to try goat cheese as the stuffing.
Jalapeno Poppers
(makes 6)
Ingredients
6 jalapeno peppers
6 tbsp goat cheese with herbs
1/2 cup breadcrumbs
1 egg, beaten
oil for deep frying
Method:
1. Make a slit in each jalapeno pepper leaving the stem intact. Remove the inner membranes and seeds. Wear gloves while doing this!!! Otherwise your hands will be burning with pain for several hours afterward (I was foolhardy and I swear it will never happen again).
2. Stuff a tbsp of goat cheese into each pepper through the slit. Press it closed.
3. Dredge each stuffed pepper in egg and breadcrumbs twice (egg-breadcrumbs-egg again-breadcrumbs again), then deep fry till golden brown.Drain on paper towels and serve right away.
These were delicious! The double-dipping has two advantages: it seals the peppers well so that the stuffing does not leak out, and it makes for a thicker coating which tastes wonderful. The spicy crunchy peppers contrast beautifully with the tangy creamy goat cheese. The stem makes for a cute handle to get a grip on the peppa'.
I liked the goat cheese filling but next time I will experiment with different stuffings. A couple of ideas:
1. Minced onion, carrot and grated mozzarella
2. Mashed potato and grated paneer (Indian-style cottage cheese)
So how did you like my spread? Thanks Stephanie for inviting me to yet another great party...I think I actually enjoyed the big game night.
Sunday, October 16, 2005
F is for Farazbi Patties and Fanas Bhaji
This article is part of a special series called "The A-Z of Marathi food". India is the land of diversity. Each of the 28 states in India has a unique cuisine but the Indian food served in restaurants represents only a tiny fraction of our culinary heritage. I come from the western Indian state of Maharashtra. Capital: Bombay (Mumbai). Population: 96 million (only 11 countries in the world have a population higher than Maharashtra). Language: Marathi. Traditional Marathi food is earthy and humble, diverse and very tasty. It also remains relatively unknown to non-marathis. Its time to change that. I invite you to join me on an alphabetical culinary tour of my state. We will go through the letters A to Z and make a dish with each letter to show-case Marathi cuisine.
F is for Farazbi Patties and Fanas Bhaji
This weekend finds us at the letter "F", not the easiest one but we shall see. The most anticipated "F" in any Marathi food must be Faraal. This is not a single dish, but a collective name for all the mouth-watering goodies that get made for "Diwali"...the festival of lights. Come Diwali, households everywhere start the holiday cooking in earnest. Both sweet and savoury goodies are made and stored for the festive season. Most of these are snacks which can be stored for days in an air-tight container. Sweets can include turnovers stuffed with coconut (Karanji) and round balls made with sweetened chickpea flour (besan ladoo). Savouries often include the ever-popular chivda and spicy fried spirals called chakli. This faraal is served to friends and relatives who visit during the festive season. Platters of faraal are also exchanged between friends and neighbours. We will save the faraal-making for November, when Diwali rolls around. Speaking of festivals, Cathy is hosting a holiday-themed blogging-by-mail where bloggers and non-bloggers alike are invited to exchange care packages through the mail, so do sign up if you like!
F also stands for two really delicious vegetables: one rather common here in the states and one really quite unusual.
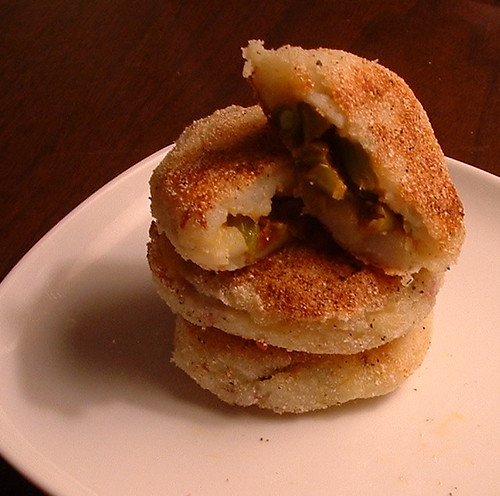
Did you guess what they are? The first is farazbi or green beans. These are found just about everywhere...in the US, green bean casserole seems to be very popular around the holidays. In Marathi food, the farazbi plays many roles. It is served as a simple vegetable with dal and rice, and also is part of all mixed-vegetable dishes like pilafs and curries. Today, I am making an appetizer with farazbi...potato patties stuffed with a spicy green bean mixture. These are dipped in flour paste and rava (cream of wheat) instead of egg and breadcrumbs and turn nice and crispy.
Farazbi Patties
Ingredients:
For filling...
2 cups green beans, trimmed and chopped
1 small onion, minced
1 tsp cumin seeds
1 tsp ginger-garlic paste
1/4 tsp turmeric
1/2 tsp red chilli powder/cayenne pepper
salt to taste
1 tbsp oil
For potato mixture...
4 medium potatoes, boiled
salt to taste
oil for frying
1/2 cup rava/cream of wheat or cornmeal
1 tbsp cornflour/ all-purpose flour
Method:
1. Heat 1 tbsp oil in a skillet. Add the cumin seeds and onions, then the rest of the ingredients for the filling. Stir fry for a couple of minutes, then cover and cook till the beans are cooked well. Set aside.
2. Mash the potatoes with the salt and knead to make a soft potato dough. Set aside.
3. Assemble patties: Grease your palms, then place a lemon-size potato ball on it. Flatten to a disc. Add a spoonful of filling in the center of disc, then bring up the edges and seal them around the filling. Flatten this patty, make all patties this way.
4. Mix the cornflour with 1/4 cup water to make a thin paste. In another dish, place the rava or cornmeal.
5. Dredge each patty in the flour paste, then the rava/cornmeal, then shallow fry the patties till golden brown.
6. Serve hot, with any chutney or ketchup.
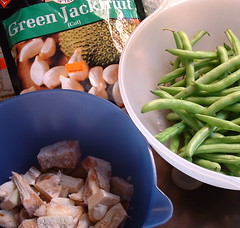
The second vegetable is an exotic tropical one: fanas or jackfruit ...yes, the same one that Mika's blog is named after. This is a formidable fruit, huge and prickly. It grows in the humid coastal regions of India, and when I was a kid, folks visiting from the Konkan coast would often bring over jackfruits from their gardens. The ripe jackfruit is good to eat; although with its distinct aroma, it is something of an acquired taste. Raw jackfruits are made into a delicious curry. I have never cooked jackfruit before, and don't even have a recipe to cook it. But today I found frozen cut fanas in the Indian store and decided to make up a recipe and cook it. My method has absolutely no claims to authenticity! Raw jackfruit, cooked into a curry has an unusual quality: it tastes like meat! The texture is startlingly meaty, and my friend SR tells me that in Bengal, they call jackfruit "tree goat"!
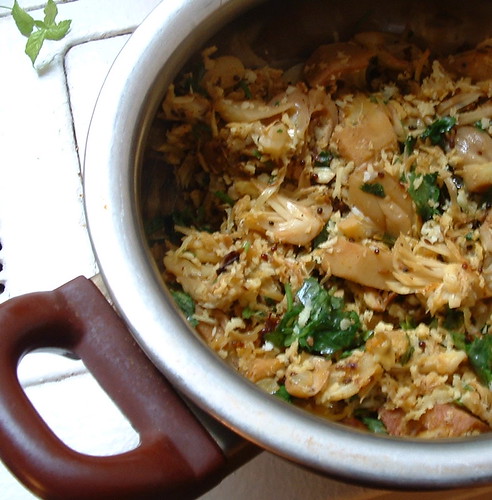
To make this dish, I simply sauteed the frozen jackfruit in some onion seasoned with cumin seeds, mustard seeds, turmeric and chilli powder. I cooked it, covered, till it was tender (10-15 minutes), then garnished with grated coconut and cilantro.
Fanas Bhaji
This dish was simple but tasty and I enjoyed my first jackfruit-cooking experience, wimpy as it was with the frozen variety!
I hope you will join me next week for "G" foods. Any ideas for "G"?
Saturday, October 15, 2005
Cucumber Pancakes
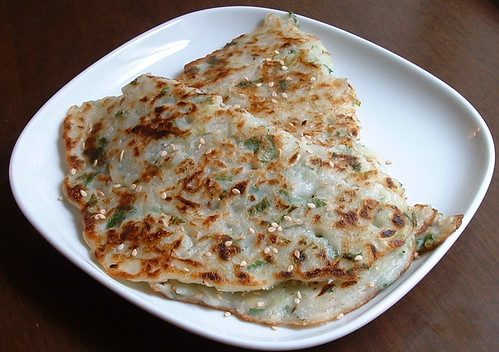
I love breakfast! I am something of an early bird: I am usually up by 6.30am or so even on weekends, and by 9am I am ready for a big breakfast. One breakfast favorite all over the world is pancakes. There is something very comforting about mixing up a big bowl of batter and frying it up so the whole home fills up with the sizzle and the aroma...it is the perfect start to a relaxing weekend. I love all kinds of pancakes but today, I made these rather unusual ones. The recipe is from my paternal grandmother, who was Konkani. They are made with cucumbers and rice flour and their traditional name is "tausalli". Unlike traditional pancakes, they do not contain eggs or milk, making them vegan. The addition of sesame seeds adds a nice crunch and upps the nutritional value too! Rice flour is available in Indian grocery stores and is a useful pantry staple in my home.
Cucumber pancakes
(Makes 4-5 pancakes)
Ingredients:
2 large cucumbers
1 cup rice flour
2 tbsp minced cilantro
2 chillies, minced
1 tsp cumin seeds
salt to taste
2-3 tbsp sesame seeds
Method:
1. Peel the cucumbers and grate them into a big bowl so as not to waste the juices.
2. Add the rest of the ingredients, except sesame seeds, and make a batter (of pancake consistency) with as much water as is required.
3. Heat 1 tsp oil in a non-stick pan. Drop a ladle-ful of batter into the pan and spread it around. Sprinkle sesame seeds on the batter. When the underside is crispy, flip over and cook the other side. Make more pancakes the same way, sprinkling sesame seeds on one side.
4. Serve hot with any relish/chutney/ketchup of your choice.
Two more tips:
1. You could add some yogurt to the batter to give it an ever so slightly tangy edge. 1/2 cup of yogurt or buttermilk + enough water to make the batter.
2. Add a tablespoon of rava (cream of wheat) to the batter to make the pancakes even crisper.
(Thanks to Lulu and Yoma for reminding me of these tips!)
Weekend Dog Blogging #5
Snug as a Bug in a Rug. Quite literally. Is that comfy enough for you, Dale?
Check out all the other pooches at their usual sweetnicks hang-out.
Sunday, October 09, 2005
E is for EGG RASSA and EGGPLANT KAAP
This article is part of a special series called "The A-Z of Marathi food". India is the land of diversity. Each of the 28 states in India has a unique cuisine but the Indian food served in restaurants represents only a tiny fraction of our culinary heritage. I come from the western Indian state of Maharashtra. Capital: Bombay (Mumbai). Population: 96 million (only 11 countries in the world have a population higher than Maharashtra). Language: Marathi. Traditional Marathi food is earthy and humble, diverse and very tasty. It also remains relatively unknown to non-marathis. It's time to change that. I invite you to join me on an alphabetical culinary tour of my state. We will go through the letters A to Z and make a dish with each letter to show-case Marathi cuisine.
Other
E is for Egg Rassa and Eggplant Kaap
E is a hard letter! However, it does stand for two English words, Egg and Eggplant which hold great potential in Marathi food, so thats what I went with.
Eggs are a wonder food just like the beans we looked at last week: being nutritious, easily available and inexpensive. Egg curry-Rice happens to be my favorite comfort food.
Every single region of India has its own style of making curries and thousands of recipes exist for egg curry. The one I have chosen is the curry or "rassa" ("ras" means juice and "rassa" is a juicy preparation...a curry) from my home-town. My home-town of Kolhapur is an ancient temple town...a city that grew around the famous Mahalaxmi Temple. For a temple town, Kolhapur has plenty unpious bad-boy attitude! It is a city well-known for its colorful language (the kind of profanity thrown around in routine Kolhapuri conversation would make a truck driver blush); bold folk dances called "lavanee"; a love of meat (vegetarians like myself are an exotic species in Kolhapur); and most of all, for its spicy spicy food.
The typical feast meal in Kolhapur: a dry mutton dish, a mutton "tamda rassa" (red curry), a yogurt-based mutton "pandhra rassa" (white curry), rice and onion relish. How's that for a balanced diet?? As an aside, Kolhapuri women have a well-deserved reputation for being feisty ("Lavangi Mirchi Kolhapur-chi") as V found out the hard way :)
As a tribute to my Kolhapuri roots, I made an Egg rassa lunch. The curry is not hard to make at all, and the result is very fragrant and tempting. The deep flavors of this curry are very authentic. Anyone who does not care for eggs can easily put some veggies in instead...potato and cauliflower is a good combination.
E is for Egg Rassa (Egg Curry)
serves 4-6
Ingredients:
6 eggs, hard-boiled
2 large onions, roughly chopped
2 large tomatoes, roughly chopped (or 1 cup canned crushed tomatoes)
1 cup fresh/frozen grated coconut (or 1 cup coconut milk)
Spices
1 tbsp. minced ginger
1 tbsp. minced garlic
2 tsp. coriander seeds
1 tsp. cumin seeds
1 tsp. poppy seeds
1/2 tsp. fennel seeds
1/2 tsp. peppercorns
1 or 2 whole cloves
1 tsp. turmeric
1 tsp. red chili powder
Salt to taste
Other
1 tbsp. oil
A handful of minced cilantro for garnish
Method:
- In a pan, heat the oil and fry the onions for several minutes until lightly browned.
- Add everything listed under spices and fry for a few minutes until aromatic.
- Add the coconut and tomatoes and continue frying for 3-4 minutes.
- Let the mixture cool for about 20 minutes, then blend it into a fine paste (a powerful blender like the Vitamix is best here, or an Indian mixie), using some water as necessary.
- Transfer the paste back to a saucepan and add enough water to make a thin or thick curry as you prefer; bring to a boil and simmer for 10 minutes.
- Peel the boiled eggs, halve them and add them to the curry. Simmer for another minute.
- Garnish with cilantro.
- This curry is good with steamed rice, crusty bread or flatbread like pita/naan.
To make a traditional Kolhapuri meal, serve this egg rassa with jeera rice and dahi kanda (yogurt-onion relish). Both are very easy to make.
Jeera Rice
In a saucepan, combine 1 cup long-grained rice (Basmati or jasmine works best), 2 cups water, dash of salt, 1 tsp cumin seeds. Bring to boil, then simmer will the rice is tender. This also works well in a rice cooker or instant pot (look up recipes for ideal rice:water ratio.
Yogurt-Onion Relish
Slice some onion really really thin (a mandoline would be helpful here). Mix the onion with yogurt, a dash of salt, and some minced cilantro. Add some milk to thin the relish if the yogurt looks too thick.
The next "E" dish is also one of my favorites; because it tastes so good and because it is made in minutes. Kaap means "cut" in Marathi so this simply refers to cuts of vegetables which are pan-fried to make a side dish. This is one of those dishes that you make at the last minute to jazz up a simple meal of dal and rice, or when you need an extra side dish at the last minute.
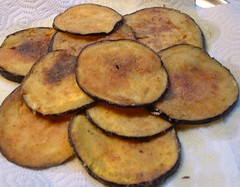
Eggplant Kaap
serves 4-5 as side dish
Ingredients:
1 large eggplant
1/2 cup rice flour
1/2 tsp turmeric
1/2 tsp red chilli powder/ cayenne pepper
Salt to taste
Oil for frying
Method:
1. Wash the eggplant and cut into slices crosswise. The thickness of the slices can be 1/4-1/2 inch thick, depending on whether you prefer the "kaap" crispier or "meatier". Set aside. Some people peel, salt and drain the eggplant but I have never found this to be necessary.
2. On a plate, mix the rice flour, salt, turmeric and chilli powder.
3. Heat 1/2 inch of oil in a skillet.
4. Dredge each slice in the flour mixture, patting so that it gets coated on each side, and shallow-fry the eggplant on each side till crispy. Drain on paper towels.
Serve hot with rice and dal. Other vegetables that make good kaap are: raw plaintains, potato, yam, pumpkin. A mixed "kaap" platter is a real treat!
That concludes our "Egg-citing" E-journey. The next letter is "F". Hmmm...any ideas for this one?
Saturday, October 08, 2005
Weekend Dog Blogging #4
This is Dale, hiking on Bear Mountain (upstate New York)...the intrepid explorer...off to pee where no dog has peed before...
Can you hear all the woofs over at Sweetnicks and miaows at Eat Stuff?
Tuesday, October 04, 2005
EoMEoTE #11: Seventies Song Lyrics!
Tasty Together
(Sing to the tune of "Happy Together"...the a cappella hit from the Nylons)
Imagine eggs and carbs, I do
I think about them day and night
It's only right
To think about the food you love
And cook it right
So tasty together
If I should buy some eggs
Invest in a pan
And you say you'll eat breakfast with me
And ease my mind
Imagine how the world could be
So very fine
So happy together
{Refrain
I can't see me loving nothing but eggs
For all my life
When they're with me
Baby the tummy is full
For all my life}.....
*giggle*
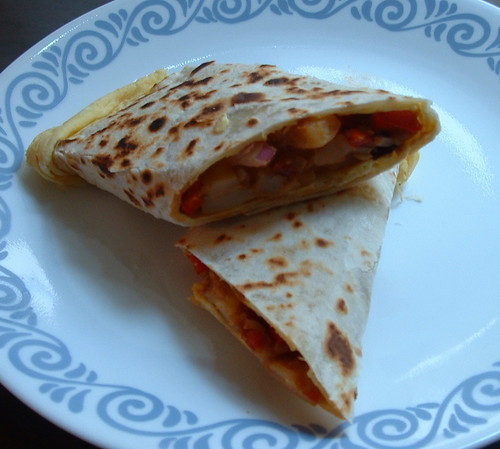
I made a retro-sounding snack, The "FRANKIE", a popular street snack in Bombay.
It is a tasty portable snack...very easy to throw together. Frankies with all kinds of fillings-meat, cheese, potatoes-are very popular all over Bombay and I am told that versions of these snacks exist all over India. My home-made version uses twice-cooked potatoes that are seasoned very generously so that each bite is a taste explosion. The egg wash makes it very filling and delicious!
To make 4 frankies, you need:
4 flour tortillas/rotis
2 large eggs
2 large/3 medium potatoes
1 pepper (red or green), diced
1 small onion, minced
2 tbsp cilantro, minced
1 tsp chaat masala
1 tbsp lemon juice
1 tsp red chilli powder/cayenne pepper
1/2 tsp aamchur (dry mango powder)
salt to taste
pepper to taste
Method
1. Beat eggs with some salt and pepper and set aside
2. To make the filling: (a) Dice potatoes and place in a pan with water. Boil till just tender. Drain. (b) Heat 1 tbsp oil in a pan. Fry the pepper and boiled potatoes till browned and crispy. (c) Remove pan from heat. Add onion, cilantro, lemon juice and all the spices, tasting to check that the mixture is tangy and well-seasoned. The filling is ready.
3. To assemble each frankie, heat a tortilla in a non-stick pan. Ladle some egg on the tortilla and spread around. Overturn the tortilla briefly to cook the egg. Flip back and let the torilla crisp-up on the non-eggy side. Remove from pan, add some filling and roll it up. Serve hot.
Do visit the happy sorceress for some great egg recipes and a lot of 70s nostalgia!
Sunday, October 02, 2005
D is for Dalimbay Bhaat
This article is first of a special series called "The A-Z of Marathi food". India is the land of diversity. Each of the 28 states in India has a unique cuisine but the Indian food served in restaurants represents only a tiny fraction of our culinary heritage. I come from the western Indian state of Maharashtra. Capital: Bombay (Mumbai.) Population: 96 million (only 11 countries in the world have a population higher than Maharashtra.) Language: Marathi. Traditional Marathi food is earthy and humble, diverse and very tasty. It also remains relatively unknown to those outside the state. It's time to change that. I invite you to join me on an alphabetical culinary tour of my home state. We will go through the letters A to Z and make a dish with each letter to showcase the cuisine that I grew up on.
D is for Dalimbay Bhaat
Today we continue the journey with the letter "D", another letter with lots of foodie potential! Thank you all for some great "D" suggestions.
Dairy foods hold an important place in the predominantly vegetarian Indian diet, and Dahi (yogurt) and Dudh (milk) both happen to be "D" words. Yogurt has many nutritional benefits and most Marathi meals are served with home-made yogurt as a side dish. I confess that I don't consume enough yogurt to actually make it myself, making do with the weekly jar of branded store-bought yogurt instead. But if anyone wants to try their hand at making Dahi, Indira has written a very informative post about making home-made Yogurt. Yogurt is eaten plain, as a side-dish but itself also forms part of some delicious recipes. One of the most popular "chaat" foods showcasing Dahi is the Dahi Vada that I made recently.
Other "D"s include some wonderful vegetables, including Dudhi (a cousin of the pumpkin with pale green skin and milky flesh), Dhabbu mirchi (the green pepper or capsicum, the word literally means "chubby pepper"!) and my personal favorite, the ridge gourd or Dodka.
But the most far-reaching "D" food has to be Dal. A simple three-letter word which is all inclusive of the peas, beans and lentils that are the seeds of legume plants. Dals are a miracle food...nutritionally, they are rich in protein and fiber while being low in fat; dals can be dried and stored for long periods, thus being available year-round, the variety of dals means that you need never be bored eating rice-and-dal; and even ecologically, legume plants play an important role in "fixing" nitrogen in the soil and enriching it. What's not to love, right?
I decided to peek into my kitchen and check out how many types of dals I really have on hand. Total: 11, and a few jars are empty, to be refilled on my next visit to the Indian store. Here is the gallery of the dals I have on hand, demonstrating the amazing variety; in size, from the wee moong dal to the gigantic butter beans; in color from the pale urad dal to the dark lentils; in shape and indeed, taste.
A Gallery of Dals
The inspiration for this decorative arrangement came from the Indian folk-art of Rangoli in which colored powders are artfully used to make beautiful geometric patterns on the floor. The word "dal" is written in english, hindi and marathi, the three languages I know and love.
All whole beans can be easily sprouted to make them even more nutritious. I have already blogged about recipes using many of these dals, including Toor Dal, Chavli/Black-Eyed Peas, Whole Lentils, Urad Dal, Chana Dal and Kidney Beans.
Dals can form the base for other tasty dishes. One really interesting dal dish is a pasta-like recipe which uses dal as the sauce: Mika wrote about this delicious dish, called Dal Dhokli a few months ago.
So what am I making today? I chose a bean that is very popular in Marathi cuisine, a tasty bean called Vaal or Dalimbay. This bean has a pleasant slightly bitter flavor ( the same way greens are pleasantly bitter). Dalimbay are made into a curry or a rice (bhaat) and the latter is what I chose to make for a nice simple Sunday lunch.
The beans first need to be sprouted:
This is what they look like (1) in the dry state (2) after overnight soaking (3) after 2 days of sprouting. These sprouted beans then have to be peeled. The peel pops right off and it is even easier to do if you place the sprouted beans in a bowl of warm water. Now making the rice is really easy; Bhaat in Marathi means rice.
Dalimbay Bhaat
(serves 4-6)
1 cup rice, uncooked
1 1/2 cup dalimbay beans, sprouted and peeled
1 onion, sliced
5-6 curry leaves
1/2 tsp mustard seeds
1/2 tsp cumin seeds
1/2 tsp turmeric
1/2 tsp red chilli powder/cayenne pepper
1 tsp garam masala/ amti masala
1 tsp coriander powder
1/2 tsp cumin powder
salt to taste
2 tbsp oil
2 tbsp minced cilantro
2 tbsp grated coconut (fresh or frozen)
Method:
1. Heat oil and make a "tadka" with mustard and cumin seeds.
2. Add curry leaves and onion and fry till onion is cooked and transluscent.
3. Add turmeric, chilli powder, garam masala/amti masala, coriander powder, cumin powder, salt and saute for a few seconds.
4. Add rice and beans and saute till coated with all the spices.
5. Add 3 cups water, bring to a boil and then simmer, covered, till rice and beans are tender and done.
6. Garnish with cilantro and coconut.
Serve hot with pickles, papad and yogurt.
Hope you enjoyed the "D" foods...next we come to "E" which is a bit of a challenge! Would anyone like to give any ideas with this one?
Saturday, October 01, 2005
Sweet and Easy: Fig Walnut Kulfi
I recently got my hands on Suvir Saran's Indian Home Cooking at the local library. Saran's restaurants are all the rage in Manhattan right now, so my interest was piqued. Also, Cathy reported that she tried a recipe from this book and was happy with the results (it was her first foray into Indian food), so I felt encouraged to try some recipes too.
The food in this book is luscious, with beautiful photographs and a pleasing layout. The recipes tend to be home-style North Indian, reflecting Saran's roots, and as a fan of regional cuisine, I love that.
Today I wanted to bring dessert over to the home of some friends, and I decided to adapt Saran's recipe for no-cook Kulfi. Kulfi is Indian-style ice cream and the time-honored method of making it involves a great deal of sweating over a hot stove, as I have done to some extent before. This method takes all of 5 minutes from start to finish, plus a tiny bit of soaking time.
1 (12 oz) can evaporated milk (low-fat OK)
1 (14 oz) can sweetened condensed milk (low-fat OK)
1 cup heavy cream
1 tsp cardamom powder
1/2 cup walnut pieces, divided
8 dried figs
1/2 cup milk or water
Method:
The verdict was unanimous: the kulfi is tasty and creamy, and just delicious. The taste of walnuts and figs is very deep since some of them are blended into the mixture, yet the chunky pieces add texture to every bite. This one is a keeper!
The food in this book is luscious, with beautiful photographs and a pleasing layout. The recipes tend to be home-style North Indian, reflecting Saran's roots, and as a fan of regional cuisine, I love that.
Today I wanted to bring dessert over to the home of some friends, and I decided to adapt Saran's recipe for no-cook Kulfi. Kulfi is Indian-style ice cream and the time-honored method of making it involves a great deal of sweating over a hot stove, as I have done to some extent before. This method takes all of 5 minutes from start to finish, plus a tiny bit of soaking time.
Anjeer-Akhroad Kulfi (Fig-Walnut Kulfi)
(adapted from Indian Home Cooking by Suvir Saran and Stephanie Lyness, makes 6-8 servings)1 (12 oz) can evaporated milk (low-fat OK)
1 (14 oz) can sweetened condensed milk (low-fat OK)
1 cup heavy cream
1 tsp cardamom powder
1/2 cup walnut pieces, divided
8 dried figs
1/2 cup milk or water
Method:
- Place the figs in a bowl with 1/2 cup milk or water. Microwave for a minute, then cover the bowl and let the figs soak for 10-15 minutes to soften and rehydrate. Chop the figs into small pieces.
- Mix together the evaporated milk, condensed milk, cream, half of the walnuts and half of the fig pieces. Process with immersion blender/ food processer/ regular blender for a few seconds.
- Add the cardamom and the rest of the walnut and fig pieces to the kulfi mixture and stir in.
- Pour the mixture into a container and freeze for several hours till solid. Lining the container with plastic wrap is an easy way to unmold the kulfi without a mess. Freeze in popsicle molds for individual servings.
The verdict was unanimous: the kulfi is tasty and creamy, and just delicious. The taste of walnuts and figs is very deep since some of them are blended into the mixture, yet the chunky pieces add texture to every bite. This one is a keeper!
WDB#3
Hello! I'm Dale, lounging on my bed after a hard day's play at the dog run. See what a big bad boy I am, ripping up the sheets by scratching my long beautiful nails on them! And do visit Sweetnicks to admire all my other friends.