This month's theme for Jihva for Ingredients, hosted by Rosie of What's the recipe today Jim? is the...herb? vegetable? spice? ginger. A knobby, gnarly, ugly root that is beloved by so many cuisines. Just the word ginger gives me a warm, cozy, delicious feeling. [It also makes me want to run and hide from my parents' crazy, over-sized, hyperactive Doberman Pinscher named "Ginger" but that is a story for another day]
Truly, ginger brings a lot to the table. My favorite way to consume it in vast quantities these days is via Trader Joe's triple ginger cookies, addictive little morsels jammed with fresh, ground and crystallized sugar. These are the only cookies in the world that I enjoy eating on a regular basis (apart from Parle G, that is).
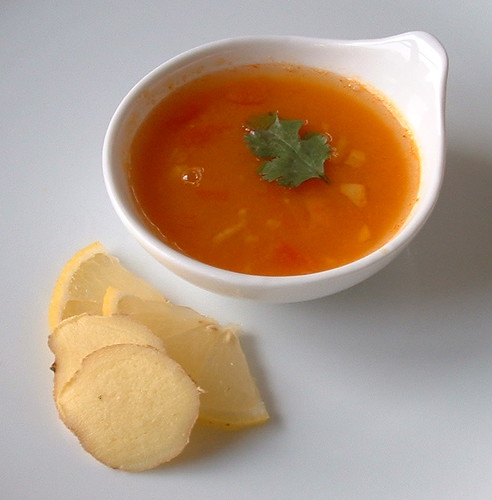
Today, I am making the simplest preparation with ginger: what should be properly called a rasam-inspired ginger-lemon dal, for it uses more dal than rasams do. A simple lentil preparation with typical Southern Indian spices, it contains plenty of lemon juice and minced fresh ginger. With some freshly steamed rice, it makes a homely meal. By itself, sipped as a soup, it has magical properties: it can clear up sinuses, banish the winter blues, perk up jaded palates and warm you from the inside out.
Oh, and I also want to share my favorite ginger-related kitchen tip: peeling ginger with a small spoon. It really works!
Ginger-Lemon Rasam
(serves 4-5)
1. Soak 3/4 cup of toor dal for 10-15 minutes, then rinse it well and cook it on the stove-top or pressure cooker and set aside.
2. Heat 1 tsp oil. Make the tempering using: 1/2 tsp mustard seeds, 1/2 tsp cumin seeds, pinch of asafoetida, 5-6 curry leaves, 1 dry red chili broken in half.
3. Add 1 tbsp very finely minced fresh ginger, 1/2 tsp turmeric and stir, then immediately add 1/4 cup diced tomato (fresh or canned) and salt to taste.
4. Stir in 1 tsp sambar powder and the cooked dal.
5. Add 2-3 cups of water to make a fairly dilute dal. Bring to a boil and simmer for 4-5 minutes.
6. Remove from heat, then add the juice of one fresh lemon and garnish with minced cilantro. Serve piping hot as a soup or a dal!
Thanks, Rosie, for hosting! I look forward to some great gingery goodness in the round-up!
▼
Wednesday, January 31, 2007
Tuesday, January 30, 2007
Working on a new look...
Just a little note to say: I just switched to the "new" blogger, and over the next few days, you will see me struggling to change the look of One Hot Stove a little bit, just in time for its second birthday! I want to use the cute woolen Marathi thali as a header symbolizing the regional Indian cuisine that features so often on this blog. Like it? The fact that I know less than nothing about creating webpages is a little bit of a problem, but I am taking it all in stride and treating this as a learning experience. Please bear with me as the blog is under renovation, and as usual, all comments and suggestions are welcome!
Sunday, January 28, 2007
A is for Aloo Gobi
The myriad cuisines of India all love their vegetables! Veggies are diced and sliced, grated and mashed, stir-fried and curried into hundreds of vegetable dishes. In this series, the A to Z of Indian Vegetables, we take an alphabetical journey through the various avatars of vegetables relished in Indian cuisine. For each letter, we will make a tasty vegetable dish that illustrates one manner in which vegetables are savored in India.
A is for Aloo Gobi: The simplest stir-fry (North-Indian style)
We kick-off the series with a crowd-pleaser. Aloo Gobi simply means potato-cauliflower, a combination of two beloved vegetables cooked together with some simple spices. The humble aloo gobi can be found on the menu of practically every Indian restaurant on the planet, although one might say that it is more of a North Indian style recipe, originally from the Northern state of Punjab. So aloo gobi is an example of a simple stir-fried vegetable dish, North-Indian style, and is homely enough for everyday meals, and loved enough to be served at a nice dinner.
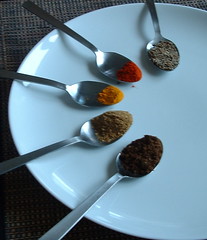
There are dozens of recipes for making aloo gobi; in some cases, potato cubes and cauliflower florets are deep-fried (!) before being tossed with spices, in some recipes, you would add some tomato to the stir-fry resulting in a light curry. My version of aloo gobi is the simplest possible. It calls for very basic ingredients and not much oil. You do not need an extensive Indian pantry to make this dish: it only calls for 6 spices (from top to bottom in the picture): cumin seeds (1), red chili powder or cayenne pepper (2), turmeric (3), cumin powder, coriander powder (4 is a blend of cumin and coriander powder that I make at home but you can just use the separately ground spices as they are sold), garam masala (5).
The best part is that all these spices, except maybe garam masala, are available in just about any grocery store/ supermarket. And even garam masala is now available in many of the better food stores such as Whole Foods and spice markets such as Penzey's as well as Indian stores and International stores everywhere. You can make your own blend at home using a spice grinder too. The liberal use of garam masala is the hallmark of Punjabi cuisine.
You start making this dish with a little prep: Chop a small onion into thin slices, cut a cauliflower into bite-size florets and wash, peel and dice two potatoes into medium cubes. Then set out your spice bottles and we are ready to make some aloo gobi!
Aloo Gobi
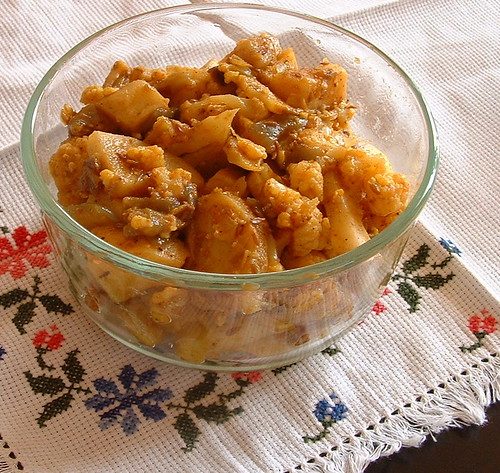
(serves 4-5)
Ingredients:
1 medium-large head of cauliflower, cut into bite-size florets
2 medium potatoes, peeled and cubed
1 small onion, sliced
2 tbsp oil
1 tsp cumin seeds
1/2 tsp turmeric powder
1/2 tsp red chili powder (cayenne pepper)
1/2 tsp cumin powder
1/2 tsp coriander powder
1 tsp garam masala
1 tsp salt (or to taste)
Method:
1. A wide saucepan is ideal for making aloo gobi as it has a large surface area for the vegetables to come in contact with heat. Heat oil in the pan on medium heat. Add the cumin seeds and stir until they sizzle. This is called "tempering" the oil as the oil acquires a wonderful cumin flavor during this step.
2. Add the onion and stir-fry for a few minutes until onion is starting to brown at the edges.
3. Lower the heat and add in the spices from turmeric to coriander powder. Stir only a few seconds to get the spices coated with oil.
4. Add the potato and cauliflower and stir well to mix in the spices. Add the salt and garam masala.
5. Let the vegetables cook until tender. My usual method is to cover the pan and let the veggies cook in their own juices which are released due to the salt. The vegetables at the bottom of the pan get browned, and you keep stirring every 2-3 minutes to evenly cook the vegetables. If you feel like there is not enough steam building up and the vegetables are sticking at the bottom, add 1/4 cup of water. Insert a knife point or skewer into a potato cube to test for tenderness. Turn off the heat once vegetables are tender (do not over-cook).
6. Let the "subzi" (vegetable) rest for 10 minutes, then serve warm.
Variations on a theme: This is the simplest stir-fry and these are some easy ways to jazz it up...
1. Garnishes can take the dish to a whole new level. Minced cilantro is the easiest garnish for color and flavor. The other one is a squeeze of fresh lemon juice; this really brightens the dish. Both garnishes are added right after you turn off the heat after the dish is cooked.
2. Ginger makes a wonderful pairing with the vegetables and the spices. Take a knob of fresh ginger and peel it (I use the edge of a spoon to do this), then mince the ginger. Add one tsp of minced ginger at step 3 of the recipe.
3. Make this a mixed-vegetable dish by using only 1/2 cauliflower and 1 potato and instead adding 3/4 cup diced carrots, 1/2 cup green peas (frozen works great) and 3/4 cup of trimmed and chopped green beans.
How do you serve this dish? The traditional way is to (a) scoop it up with flatbreads like roti or naan and (b) eat it with some dal and steamed rice. But you can let your imagination run wild and eat it (c) stuffed into a pita, (d) on a salad bed (cucumber, tomato, radishes, chopped and tossed with some yogurt), (e) in a sandwich with a slice of cheese.
The humble aloo (potato) is beloved in Indian cuisine...and is combined with a variety of vegetables to make easy everyday stir-fry dishes. Here are some dishes made by fellow bloggers. You will see how each cook has his/her favorite combination of spices that go into a stir-fry :
aloo bhindi (potato-okra) from Creative Pooja,
aloo baingan (potato-eggplant) from My Dhaba,
aloo shimla mirch (potato-green pepper) from Arad-Daagh,
You can, of course, combine more than two vegetable for the stir-fry...such as:
aloo matar saag (potato-peas-spinach) from Food In The Main,
and you can leave potatoes out altogether and make a different combination, like this:
gobi-mutter (cauliflower-peas) from Saffron Trail,
Saturday, January 27, 2007
Weekend Dog Blogging, Weekend Jabber
Last weekend, we got some snow on the ground (fairly unusual for St. Louis, I hear), and our dog run (dog park) turned into a winter wonderland. We tried to take a picture of Dale standing still for a moment...
But Dale takes the "run" part of "dog run" seriously, and zoomed off in a blur of fur!
Don't forget to visit Sweetnicks and see all the pups at play!
And now forsome a lot of weekend jabber...
A couple of days ago, I got the opportunity to attend a lovely tasting- for wine and sweets Valentine's day gift packages from Hollyberry Baking, a lovely little baking company right here in St. Louis. Hollyberry is known for their delicious all-natural home-style cookies, and this year, they are pairing their sweets with some amazing wines. It is quite the trend to pair wine with rich desserts but a bit unusual to pair wine with homely comforting desserts like cookies and brownies. It was fun to eat kid-at-heart treats with a grown-up spin of wine on the side. I also got to taste a St. Louis specialty dessert: gooey butter cake, which certainly lived up to its name by being very gooey and very rich! Click here to see all of Hollyberry's Valentine gifts.
Speaking of rich desserts, I hope all you chocoholics out there will visit David Lebovitz's blog and drool over the Chocolate by brand mega-round-up in four parts! I can see many recipes there that I am just dying to try out.
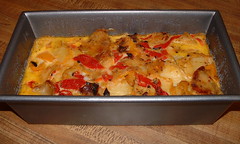
New recipes tried this week: only one, unfortunately, as it turned out to be a pretty busy work week: I made this Spanish Tortilla Loaf from an old issue of Vegetarian Times borrowed from the library. I do like the clean look of this magazine and it is always a fun read. Now here is the funny thing: EVERY SINGLE issue of "Vegetarian Times" that I have ever picked up in a public library (whether in NYC or St. Louis) has a few recipe pages missing because some unscrupulous reader tore them out! This has not been the case with any other food magazine. I can tell you that as a vegetarian, I find this quite puzzling and distressing! Anyway, I love the idea of the spanish tortilla (open-faced potato omelet). I followed this recipe to the letter (*very* unusual for me) and loved that it is one compact loaf pan that goes into the oven to bake in a bain marie.
The baking took 10-15 minutes longer than the recipe indicated but the result was delicious! I served the tortilla loaf in hearty slices with some roasted garlic salsa for a heavenly one-dish meal. This low-maintenance loaf will be perfect for a tapas party or served in little bites as an appetizer.
Check in on One Hot Stove tomorrow for the start of a brand new series: the A-Z of Indian Vegetables!
But Dale takes the "run" part of "dog run" seriously, and zoomed off in a blur of fur!
Don't forget to visit Sweetnicks and see all the pups at play!
And now for
A couple of days ago, I got the opportunity to attend a lovely tasting- for wine and sweets Valentine's day gift packages from Hollyberry Baking, a lovely little baking company right here in St. Louis. Hollyberry is known for their delicious all-natural home-style cookies, and this year, they are pairing their sweets with some amazing wines. It is quite the trend to pair wine with rich desserts but a bit unusual to pair wine with homely comforting desserts like cookies and brownies. It was fun to eat kid-at-heart treats with a grown-up spin of wine on the side. I also got to taste a St. Louis specialty dessert: gooey butter cake, which certainly lived up to its name by being very gooey and very rich! Click here to see all of Hollyberry's Valentine gifts.
Speaking of rich desserts, I hope all you chocoholics out there will visit David Lebovitz's blog and drool over the Chocolate by brand mega-round-up in four parts! I can see many recipes there that I am just dying to try out.
New recipes tried this week: only one, unfortunately, as it turned out to be a pretty busy work week: I made this Spanish Tortilla Loaf from an old issue of Vegetarian Times borrowed from the library. I do like the clean look of this magazine and it is always a fun read. Now here is the funny thing: EVERY SINGLE issue of "Vegetarian Times" that I have ever picked up in a public library (whether in NYC or St. Louis) has a few recipe pages missing because some unscrupulous reader tore them out! This has not been the case with any other food magazine. I can tell you that as a vegetarian, I find this quite puzzling and distressing! Anyway, I love the idea of the spanish tortilla (open-faced potato omelet). I followed this recipe to the letter (*very* unusual for me) and loved that it is one compact loaf pan that goes into the oven to bake in a bain marie.
The baking took 10-15 minutes longer than the recipe indicated but the result was delicious! I served the tortilla loaf in hearty slices with some roasted garlic salsa for a heavenly one-dish meal. This low-maintenance loaf will be perfect for a tapas party or served in little bites as an appetizer.
Check in on One Hot Stove tomorrow for the start of a brand new series: the A-Z of Indian Vegetables!
Sunday, January 21, 2007
Waiter...there is some Dhokli in my Dal!
Three stellar food blogs- Cooksister, The Passionate Cook and Spitoon Extra, have come together to create a brand new food blogging event that is designed to be easy and all-inclusive. It is called "Waiter There's Something In My..." and January's theme, fit for the chilly season, is STEW!
When I read the theme, my first thought was, "Oh, Indian food does not have too many stews", and my second thought was, "Oh, but Indian food is ALL stews", for what else are curries and dals, but stews? Stews are a food that can be expansively defined as anything liquidy with big chunks of something in it, whether meat or vegetables or what-have-you. After much deliberation about whether to try a new exotic stew, maybe an African peanut stew, or whether to try a vegetarian version of "chicken soup with dumplings", I came full circle and settled on something familiar, comforting and low-maintainance, for those are the exact three qualities why stews are so well-beloved.
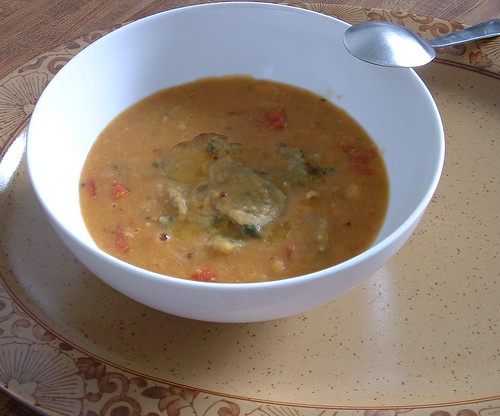
I decided to put a spin on a delicious Indian stew called Dal-Dhokli. It is a regional specialty, coming from the Western state of Gujarat. In the tradition of Gujarati food, it consists of a sweet-tangy-spicy split pea stew (dal) in which you cook little whole-wheat dumplings (dhokli). The result is a nutritious one-dish meal which has melt-in-the-mouth wheat dumplings swimming in a tasty protein-rich broth. I put a spin on the traditional version by adding chopped fresh spinach to the dumplings, which adds color, flavor and nutrition to this dish.
Spinach Dal-Dhokli
(serves 3-4 as a main dish, prep time: 45 minutes to an hour)
Ingredients:
For the Dal...
1 cup toor dal (split yellow lentils)
2 tbsp roasted peanuts
1 small onion, chopped
1/2 cup diced tomatoes (fresh or canned)
5-6 curry leaves
1 tsp mustard seeds
1 tsp cumin seeds
pinch of asafoetida
1/2 tsp turmeric powder
1/2 tsp red chili powder (cayenne pepper)
1/2 tsp cumin powder
1/2 tsp coriander powder
1 tsp garam masala
1 tbsp tamarind taste
1 tbsp jaggery (unrefined cane sugar)
salt to taste
2 tbsp oil
For the Dhokli (dumplings)
2/3 cup atta (fine whole-wheat flour)
1 + 1/2 cup packed fresh spinach leaves
1/4 tsp turmeric powder
1/2 tsp red chili powder
1 tsp cumin seeds
1 tsp sugar
salt to taste
Method:
1. Soak the toor dal in hot water for 15-30 minutes. Rinse several times, then cook in a pressure cooker or on the stove-top until tender. Set aside.
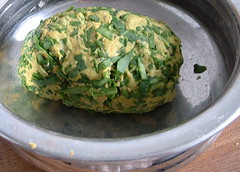
2. Dough for the dumplings: Finely chop the spinach. Add the rest of the ingredients for the dumplings and knead together to make a firm dough. Cover with a damp kitchen towel and set aside.
3. Making the dal: Heat oil in a large saucepan. Temper with mustard seeds, cumin seeds, curry leaves, asafoetida and stir for a few seconds. Add onion and stir until onion is translucent. Add ingredients from turmeric to garam masala and stir for a few seconds.
4. Stir in the tomato, cooked dal, tamarind paste, jaggery and salt and bring the dal to a boil. Taste and adjust for balance of sweet, salty and sour. Keep the dal simmering.
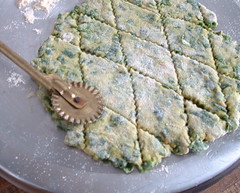
5. Now, make the dhoklis. Divide the dough into four parts. Using some extra flour, roll out each part as thinly as possible, then cut into diamond shapes, or any shapes you like.
Add the dough shapes to the boiling dal and cook them for 5-8 minutes, or until the dough is tender and cooked through.
6. Let the dal-dhokli rest for 5 minutes, then serve the stew piping hot, drizzled with ghee (clarified butter).
Dal-dhokli is a popular dish in the food-blogosphere. Check out these traditional versions from Luvbites and The green jackfruit. I found two exciting variations too: Dal dhokli stuffed with potato presented in a beautiful step-by-step manner on My Khazana of Recipes and mutter dhokli (dhoklis in pea curry) from Garam Masala.
Saturday, January 20, 2007
Weekend Dog Blogging, Weekend Jabber
Dale shows off his new scarf while lounging around at home on a cold winter day...
See all the puppies playing at Sweetnicks, where they gather together for weekend dog blogging.
And now for some weekend jabber...
I'm still going nuts over the JFI Coconut round-up: Last week, I tried the Brussels Sprouts stew contributed by Menu Today. Believe it or not, I only tasted brussels sprouts for the first time last month at a Christmas dinner at the home of a wonderful friend, where brussels sprouts were served in a delicate, creamy sauce. It was love at first bite and I knew I has to try cooking this cute little vegetable. The stew was just the thing for a crisp, cold night. Lazy as I am, I simplified the recipe by not pre-cooking or stuffing the brussels sprouts. I started by frying onions and tomatoes, then adding trimmed, halved brussels sprouts and simmering them with the coconut-spice paste. The result was divine, and very rich with the combination of cashews and coconut. What I really love about the recipe is the way a local vegetable that is not found in India has been adapted to Indian cooking with such great results.
Last Saturday, we enjoyed a very low-maintainance, informal and delicious taco night with two good friends. Now, I do enjoy spending long hours making food for friends and family, no doubt about it, but every once in a while, it is great to take the pressure off and take shortcuts shamelessly. I would call it Semi-Homemade if I did not hate that phrase with such a vengeance! :)
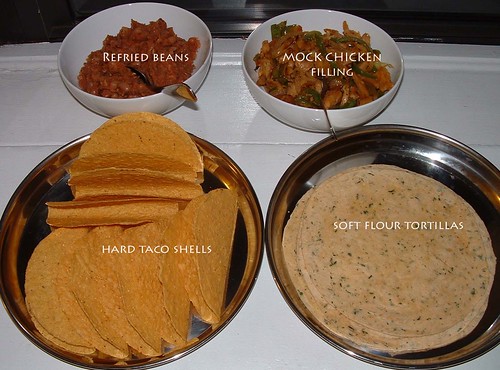
I bought two kinds of taco shells: hard crispy taco shells (before serving, just throw them in a warm oven for 5 minutes to freshen them up), and soft flour tortillas (before serving, wrap them in a paper towel and microwave for 15-20 seconds). I prepared two protein-rich fillings: One was a delicious recipe for Chili Pinto Beans shared by Susan of Fatfree Vegan Kitchen. Susan's recipe calls for pressure-cooking, making it the fastest way ever to get nicely seasoned beans on the table. The other filling was a mock chicken filling. I used Morningstar's meal starter chicken strips. The first time I tasted these chicken strips, I almost spat them out because they tasted too much like the real thing! I am not one for eating fake meat every day, but it is nice to use once in a while. I don't like that these chicken strips are pre-seasoned, though. Why call it "meal-starter" if you sell it pre-seasoned? Anyway, I sauteed some onions and peppers, and then stirred in the mock chicken, and seasoned with some oregano, cumin, cayenne pepper, black pepper and lime juice.
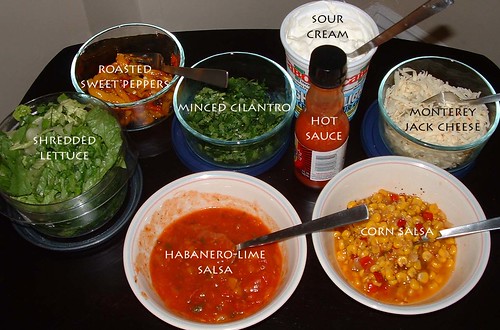
Next comes the tray of fixin's...the most fun part of the taco party. The fixin's I used: Shredded lettuce, minced cilantro, shredded Monterey-jack cheese, sour cream, hot sauce, two types of store-bought salsas (one a mild and sweet corn-chile salsa, the other a tangy and fiery habanero-lime salsa), and roasted peppers. Roasting the peppers is easy (not to mention more energy-efficient) in a toaster oven. Pre-heat the oven to 375 degrees F. Spray a small baking tray. Wash and dry 10-12 small sweet Italian peppers, then toss them lightly with some olive oil. Bake, turning once or twice, till peppers are soft and have charred spots. Cool, then slice into strips. The peppers were delightfully sweet and melt-in-the-mouth!
Apart from soaking the pinto beans and starting the pressure cooker, all the prep for taco night took me an hour from start to finish, including clean-up. What a divinely lazy way to entertain! Once the food is laid out, everyone just assembles their own tacos. If I were to complicate this party, I would have made margaritas, homemade salsa, some tortilla soup, nachos as appetizers and maybe a flan for dessert. But simple can be good too!
Finally, a feast for the eyes: Go look at the most beautiful food-blog photographs of December at the Does my blog look good in this? event hosted by Annie of Bon Appegeek.
Enjoy the weekend, everyone!
Tuesday, January 16, 2007
SHF 27: World Peace Cookies
For me, Sugar High Friday (SHF) is the sweetest event on the food-blogging calendar. Over the last couple of years, it has pushed me to try my hand at making some delicious desserts instead of taking the coward's way out and doing what I would normally do: buying a cheesecake at the local bakery or a tin of gulab-jamuns at the Indian store in Queens.
This month, SHF is being hosted by celebrated pastry chef and cookbook author (not to mention celebrated food blogger), David Lebovitz. The theme of the month, an appropriately crowd-pleasing one for the beginning of the year, is Chocolate, by brand. So, you make a dessert with chocolate, but discuss the brand of chocolate that you bought, and the reason you chose it.
And as luck would have, I was already dying to try out a chocolate cookie that calls for both bittersweet chocolate and cocoa powder, and would be just perfect for this event. I first saw World Peace Cookies on the blog I love Milk and Cookies. Even to my sweet-tooth-less self, these cookies looked decadent and delicious. They are from the book Baking: From my home to yours by Dorie Greenspan, probably the most popular baking book that was published in 2006. I myself bought a copy of the book for the most enthusiastic and competent baker in my life, my friend Laureen.
The premise of world peace cookies is that they are so delicious that a daily dose would go a long way in ensuring a happy disposition and maintaining world peace. Not a bad thing these days!
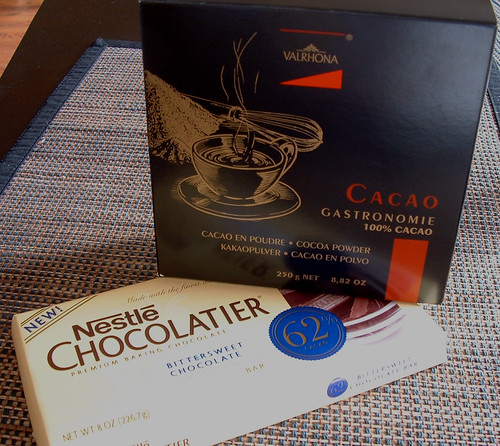
I heaved a sigh of relief when I read the theme of this SHF. Buying chocolate is all an entirely confusing business to me and I can finally expect some help. For instance, this is what happened when I went to the local gourmet food store. I found the baking aisle, and came face-to-face with a towering wall of chocolate bars and cocoa tins. I could see 4-5 different brands of bittersweet chocolate, and the most expensive one was almost three times as expensive as the cheapest. I am completely willing to pay the price for good quality chocolate, but is price really a good indication of quality in case of chocolate? I don't like the taste of Hershey's chocolate (to my palate, it has an unpleasant fatty after-taste), so that was out. After much hemming and hawing, I tossed a coin between two regular supermarket brands, Ghiradelli and Nestle, and opted for the Nestle bittersweet chocolate bar. So I have no reason for choosing this brand except that I could not stand there all day staring at chocolate bars.
Where cocoa powder was concerned, the major decision was whether to use natural cocoa powder, which is distinctly acidic and bitter-tasting, or Dutch-processed (alkali-processed) cocoa powder, which is darker and milder. In my own highly unscientific scans of blogs and web-pages, bakers seem to prefer Dutch-processed cocoa. However, all the various tins in the store contained natural cocoa. I suspect that this has to do with people wanting to buy anything that proclaims "natural" on its label. In the end, I bought the brand Valrhona which is certainly a very high-end cocoa powder if nothing else. It said nothing about the processing at all on the box, so I doubt if it is dutch-processed.
The recipe for World Peace Cookies can be found on several websites, including those of public radio stations and national newspapers and on various food blogs. I used this very detailed recipe provided by Anita of the beautiful pastry blog Dessert First.
The cookie calls for a very short list of ingredients, and is relatively simple to make. It does not call for eggs at all, resulting in a buttery shortbread-like cookie.
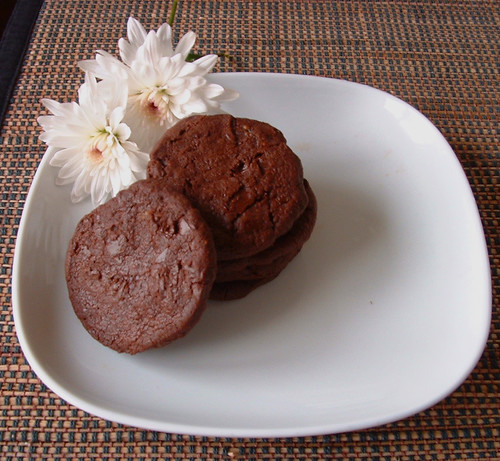
World peace cookies are more chocolatey than almost anything I have ever tasted. I sent them off with V to share with his colleagues (it is unwise to keep these cookies around the house unless you are trying to put on a few pounds fast) and everyone seemed to enjoy them.
Next time, I will use these cookies to make a grown-up ice cream sandwich by sandwiching some very good-quality vanilla ice cream between them. I think the slightly salty, rich chocolate taste of the cookies would pair well with the cold creamy vanilla.
See the wonderful round-up here.
This month, SHF is being hosted by celebrated pastry chef and cookbook author (not to mention celebrated food blogger), David Lebovitz. The theme of the month, an appropriately crowd-pleasing one for the beginning of the year, is Chocolate, by brand. So, you make a dessert with chocolate, but discuss the brand of chocolate that you bought, and the reason you chose it.
And as luck would have, I was already dying to try out a chocolate cookie that calls for both bittersweet chocolate and cocoa powder, and would be just perfect for this event. I first saw World Peace Cookies on the blog I love Milk and Cookies. Even to my sweet-tooth-less self, these cookies looked decadent and delicious. They are from the book Baking: From my home to yours by Dorie Greenspan, probably the most popular baking book that was published in 2006. I myself bought a copy of the book for the most enthusiastic and competent baker in my life, my friend Laureen.
The premise of world peace cookies is that they are so delicious that a daily dose would go a long way in ensuring a happy disposition and maintaining world peace. Not a bad thing these days!
I heaved a sigh of relief when I read the theme of this SHF. Buying chocolate is all an entirely confusing business to me and I can finally expect some help. For instance, this is what happened when I went to the local gourmet food store. I found the baking aisle, and came face-to-face with a towering wall of chocolate bars and cocoa tins. I could see 4-5 different brands of bittersweet chocolate, and the most expensive one was almost three times as expensive as the cheapest. I am completely willing to pay the price for good quality chocolate, but is price really a good indication of quality in case of chocolate? I don't like the taste of Hershey's chocolate (to my palate, it has an unpleasant fatty after-taste), so that was out. After much hemming and hawing, I tossed a coin between two regular supermarket brands, Ghiradelli and Nestle, and opted for the Nestle bittersweet chocolate bar. So I have no reason for choosing this brand except that I could not stand there all day staring at chocolate bars.
Where cocoa powder was concerned, the major decision was whether to use natural cocoa powder, which is distinctly acidic and bitter-tasting, or Dutch-processed (alkali-processed) cocoa powder, which is darker and milder. In my own highly unscientific scans of blogs and web-pages, bakers seem to prefer Dutch-processed cocoa. However, all the various tins in the store contained natural cocoa. I suspect that this has to do with people wanting to buy anything that proclaims "natural" on its label. In the end, I bought the brand Valrhona which is certainly a very high-end cocoa powder if nothing else. It said nothing about the processing at all on the box, so I doubt if it is dutch-processed.
The recipe for World Peace Cookies can be found on several websites, including those of public radio stations and national newspapers and on various food blogs. I used this very detailed recipe provided by Anita of the beautiful pastry blog Dessert First.
The cookie calls for a very short list of ingredients, and is relatively simple to make. It does not call for eggs at all, resulting in a buttery shortbread-like cookie.
- I started by setting out the butter to come to room temperature (took a few hours in this season).
- Then I used the food processor to chop the chocolate bar into little pieces. This is way easier than chopping the chocolate by hand, although the food processor made a frightful noise as it chopped the chocolate, and quite a bit of the chocolate ended up as chocolate dust rather than the small bits I was aspiring towards. It's all good (I think :)).
- Then I sifted the flour, cocoa powder and baking powder together and set it aside.
- The subsequent steps called for an electric mixer but I don't own one, so I just did it all by hand, first creaming the butter, then mixing in white sugar, brown sugar, some sea salt and vanilla extract.
- Then the flour mixture was gently mixed in. Boy, was the dough sandy and crumbly.
- I formed two logs and put them in the refrigerator overnight.
- Once the logs are ready, baking the cookies only takes minutes. The hard part was slicing the dough...it really started to fall apart, but I just patched together the pieces and moved right along.
- The cookies are baked for only 12 minutes, and they emerge from the oven looking completely wet and under-done. But as they cooled, they did firm up and were just perfect in the end.
World peace cookies are more chocolatey than almost anything I have ever tasted. I sent them off with V to share with his colleagues (it is unwise to keep these cookies around the house unless you are trying to put on a few pounds fast) and everyone seemed to enjoy them.
Next time, I will use these cookies to make a grown-up ice cream sandwich by sandwiching some very good-quality vanilla ice cream between them. I think the slightly salty, rich chocolate taste of the cookies would pair well with the cold creamy vanilla.
See the wonderful round-up here.
Saturday, January 13, 2007
Weekend Dog Blogging, Weekend Jabber
Dale, the official mascot of One Hot Stove, is making an appearance today, after many months. He is settling well into his new home, and every weekend I'll try and show you a little bit of his new life in St. Louis. Dalu's favorite thing about the new home: the sunshine that streams in through the huge windows! Dale is a sun-worshipper, every morning he catches the first sunbeam that comes in, and follows it around all day, napping here and there. See that lovely tan he has acquired? :)
A convenient square of sun right by his bed...
After a while, it is too much work to hold up his head (who turned on the gravity??)...
Later, a nap in the patch of sun right by the radiator...two sources of heat on a cold winter morning!
Please go visit all the puppies at the Weekend Dog Blogging round-up over at Sweetnicks!
And time for some weekend jabber...
Everyone who loves coconut (or even likes it just a little) should definitely visit Ashwini, who did a brilliant job hosting the Jihva: Coconut event. See the round-up for over 70 delicious coconut-ty soups, snacks, curries, desserts and more! I was excited to see dozens of recipes in the round-up that I cannot wait to try for myself. I already made Indosungod's Eggplant in a buttermilk sauce and it was absolutely delicious, even with my less-than-ideal substitution of dried coconut powder for fresh coconut.
The explosion in Indian food blogs over the past few months is so delightful...for me, it is a peek into home kitchens from many different regions of India. This is the sort of opportunity that money cannot buy! Every week, I try and make a couple of the delicious recipes that I see on other blogs, Indian or not. A few days ago, I made Cabbage Rice using the recipe shared by Vani of Mysoorean. The recipe calls for cooking shredded cabbage, then tossing it with delicious "palya powder" (Vani's mom's recipe) and cooked rice. Simple and delicious! A regional home-style recipe that I will make often.
So, do you prefer the food of "India" or of "Bharat"? What's the difference, you ask? "G" from the new Missouri blog Vyanjanaa tells us in a great little essay.
Speaking of Missouri food blogs, I have added a little list of the "St. Louis and nearby" food blogs to the side-bar. It is a small but vibrant community! Actually, Alanna organized a little treat for the St. Louis-and-nearby food bloggers in October, a wonderful food-styling and photography workshop, which I managed to attend even though (a) I was on a blogging break and (b) not even living in St. Louis yet! It was very exciting to meet many of the local bloggers, and also to meet a much-admired food blogger in person, Kalyn, who was a guest at this workshop. Kalyn has written a synopsis of the workshop, in case y'all want to read about the fun that we had!
Finally, congratulations, Kalyn...her blog, Kalyn's Kitchen, won the Best Food Blog: Theme prize in the 2006 Food Blog awards! I am so happy for you!
Whew, that was a lot of yackety-yak on my part...but then, I have much to talk about after a long break. Hope you like the weekend jabber section, and enjoy the weekend, everyone!
Wednesday, January 10, 2007
Egg Pilaf
This is my entry to the Feed-A-Hungry-Child-Campaign, a group book idea by VKN of My Dhaba.
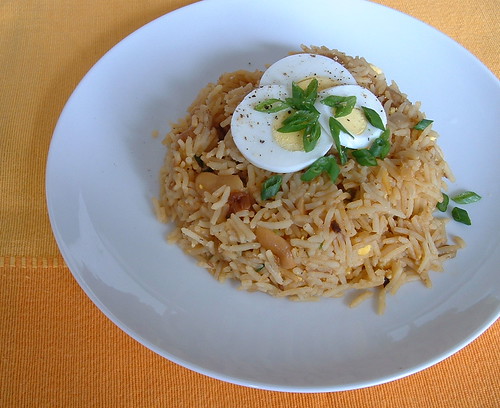
Egg Pilaf is one of my favorite comfort foods. And for a comfort food, it is prepared very easily and quickly! A blend of lightly spiced basmati rice and chunks of hard-boiled eggs, egg pilaf is a nutritious one-dish meal. Tossing in some nuts and raisins elevates it to a festive dish that makes ordinary weeknights special. The beauty of egg pilaf is that all the ingredients are pantry staples, so it can be put together even at times when grocery shopping is way overdue.
You can use any type of garam masala for this dish, whether home-made or store-bought, but my own favorite is my Mom's blend that is so aromatic that I call it Magic Masala. You simply take equal parts of cinnamon, cardamom and cloves, say, 1/4 cup each cardamom seeds and cloves, and 1 big cinnamom stick, toast them together on low heat to coax out the flavors, and then dry-grind the spices together in a spice blender to a fine powder. I store the powder in a little airtight jar in the freezer and it tastes fresh for a long time.
Egg Pilaf
(serves 3-4 as a main dish)
Ingredients
4 large Eggs
1 cup Basmati or other long-grained rice
1 large Onion
1 tsp Cumin seeds
1 tsp Ginger-garlic paste (or minced ginger and garlic)
1/2 tsp Turmeric powder
1/2 tsp Red chili powder (cayenne pepper)
1 tsp Garam masala
Salt to taste
2 tbsp Cashewnut pieces
2 tbsp Golden raisins
2 tbsp oil
2 tbsp minced cilantro (optional, for garnish)
2 tbsp minced green parts of scallions (optional, for garnish)
Method
1. Hard-boil the eggs: Place eggs in a saucepan and cover with water. Bring water to a boil, then simmer for 12 minutes. Drain the hot water, then rinse the eggs in cold water. Peel the eggs when they are cool enough to handle and set aside.
2. Cut the onion into half from root to tip, then cut each half into thin slices.
3. Place 2 1/2 cups of water in a pot to heat.
4. Heat oil in a large pot, and stir in the cumin seeds. Add sliced onion and fry first on medium-high heat for the edges of the onion to brown, and then on medium-low heat till the onions are very soft and caramelized. Browning the onions gives them a rich, deep flavor, so don't skip this step.
5. Now add the ginger-garlic, turmeric, chili powder, garam masala, salt and fry for about a minute or so. Stir in the cashews and raisins, then add the rice and hot water.
6. Cover the pot and simmer until most of the water is absorbed and the rice is tender (test a grain with your finger).
7. Let the rice rest for 15 minutes, so that the water is completely absorbed. Then fluff the rice with a fork, and toss with slices of boiled eggs. Garnish with cilantro and scallions.
Notes:
1. If you are watching your cholesterol intake, remove and discard the egg yolks and use only sliced egg whites.
2. Egg pilaf pairs well with yogurt raita (salad).
Egg Pilaf is one of my favorite comfort foods. And for a comfort food, it is prepared very easily and quickly! A blend of lightly spiced basmati rice and chunks of hard-boiled eggs, egg pilaf is a nutritious one-dish meal. Tossing in some nuts and raisins elevates it to a festive dish that makes ordinary weeknights special. The beauty of egg pilaf is that all the ingredients are pantry staples, so it can be put together even at times when grocery shopping is way overdue.
You can use any type of garam masala for this dish, whether home-made or store-bought, but my own favorite is my Mom's blend that is so aromatic that I call it Magic Masala. You simply take equal parts of cinnamon, cardamom and cloves, say, 1/4 cup each cardamom seeds and cloves, and 1 big cinnamom stick, toast them together on low heat to coax out the flavors, and then dry-grind the spices together in a spice blender to a fine powder. I store the powder in a little airtight jar in the freezer and it tastes fresh for a long time.
(serves 3-4 as a main dish)
Ingredients
4 large Eggs
1 cup Basmati or other long-grained rice
1 large Onion
1 tsp Cumin seeds
1 tsp Ginger-garlic paste (or minced ginger and garlic)
1/2 tsp Turmeric powder
1/2 tsp Red chili powder (cayenne pepper)
1 tsp Garam masala
Salt to taste
2 tbsp Cashewnut pieces
2 tbsp Golden raisins
2 tbsp oil
2 tbsp minced cilantro (optional, for garnish)
2 tbsp minced green parts of scallions (optional, for garnish)
Method
1. Hard-boil the eggs: Place eggs in a saucepan and cover with water. Bring water to a boil, then simmer for 12 minutes. Drain the hot water, then rinse the eggs in cold water. Peel the eggs when they are cool enough to handle and set aside.
2. Cut the onion into half from root to tip, then cut each half into thin slices.
3. Place 2 1/2 cups of water in a pot to heat.
4. Heat oil in a large pot, and stir in the cumin seeds. Add sliced onion and fry first on medium-high heat for the edges of the onion to brown, and then on medium-low heat till the onions are very soft and caramelized. Browning the onions gives them a rich, deep flavor, so don't skip this step.
5. Now add the ginger-garlic, turmeric, chili powder, garam masala, salt and fry for about a minute or so. Stir in the cashews and raisins, then add the rice and hot water.
6. Cover the pot and simmer until most of the water is absorbed and the rice is tender (test a grain with your finger).
7. Let the rice rest for 15 minutes, so that the water is completely absorbed. Then fluff the rice with a fork, and toss with slices of boiled eggs. Garnish with cilantro and scallions.
Notes:
1. If you are watching your cholesterol intake, remove and discard the egg yolks and use only sliced egg whites.
2. Egg pilaf pairs well with yogurt raita (salad).
Saturday, January 06, 2007
Grub For Thought
One of my favorite things about our new neighborhood is the big, airy public library that is just around the corner (lucky lucky me). I was especially overjoyed to see the generous aisles devoted to cookbooks, including shelves upon shelves of vegetarian cookbooks. One of the books I have been reading over the new year is Grub: Ideas for an Urban Organic Kitchen by Anna Lappe and Bryant Terry.
Lappe and Terry define Grub as wholesome food that is good for the body and good for the planet...organic food that is sustainably raised and locally procured. As opposed to mass-produced, highly processed food. The first part of the book talks about the principles that the authors believe in, and tips on how to incorporate "grub" into our kitchens. The second half consists of seasonal recipes.
Did the book tell me anything I was not already aware of? Well, not really. By now, the politics of food has been discussed in magazines, newspapers and on local radio, and most of us are already aware of "grub" in our own ways. I know that I certainly get angry when I think of mega-corporations taking over my kitchen. And most people I know do feel sad about living in times where a contaminated batch of spinach from one factory causes illness in five states across the continent. Still, at the beginning of the new year, the book was a reminder to cook and eat with consciousness.
Some tips and reminders from the book:
1. Our food dollars are powerful: we can use them to influence the world around us.
2. The extra time and money spent in procuring "grub" (rather than reaching for the closest mass-produced food product) is an investment in precious things: our health and the future of our planet.
3. The average American household throws 14% of its food into the trash (i.e., we waste nearly a sixth of the food we buy). So, wasting less food would be the first (and easiest) step towards a green kitchen.
4. Buy from Farmers Markets as far as possible, and try to buy fruits and veggies that are in season. How do you know what fruits and vegetables are in season? Here is where the book provided a great tip (if you live in the US): On the internet, search for your state's department of agriculture (eg. Google "Missouri Department of Agriculture"). The Department of Agriculture website provides a host of resources, like the locations of farmers markets, as well as harvest calenders.
Here, for instance, is the Harvest Calendar for Missouri:
Winter has lean pickings, but I am waiting for spring and summer and for a host of produce to come into season! If you live in St. Louis, don't forget to check out Veggie Venture, where Alanna has put together a tremendously useful list of several local food sources.
One of the recipes from "Grub" caught my eye: spicy barbecued tofu. I love eating tofu, but don't cook it nearly as much as I would like to. In this recipe, the tofu is pressed, shallow-fried to a golden brown, then drenched in a home-made barbeque sauce and baked to perfection. This is probably the tastiest tofu I have ever eaten, and I knew I had to share the recipe with you (my adaptation of it, anyway).
Barbeque Tofu
(adapted from Grub: Ideas for an Urban Organic Kitchen by Anna Lappe and Bryant Terry)
served 2-3 as a main course
Prepare the tofu:
1. Pressing: Start with 1 block of extra-firm tofu (I used Trader Joe's). Drain out the water and wrap the block of tofu in a clean freshly-laundered kitchen towel. Place in a plate/ bowl, and weigh down the tofu to press out as much liquid as possible. I did this by balancing an empty heavy pasta pot on the wrapped tofu, and placing 5 lb packets of lentils and flour in the pot. Press the tofu for 1-2 hours.
2. Slicing: Hold the block of tofu sideways, then cut into three slices. Cut each slice across one diagonal, and then the other, such that you get 12 small triangles from one block of tofu.
2. Frying the tofu: Heat 2-3 tbsp olive oil in a non-stick skillet. Fry the slices of tofu (in batches if necessary) to get them golden-brown on each side (takes several minutes).
Prepare the marinade: This can be done while the tofu is being pressed. A good barbecue sauce has such a complexity of flavors...this is what I used (with the original recipe suggestions in brackets).
Base: Canned tomato sauce 3 tbsp + soy sauce (tamari) 5 tbsp
Sweetness: Honey (maple syrup) 3 tbsp
Spice: Cumin powder 1/2 tsp
Acidity: Lemon juice (lime juice) 1 tsp + Apple cider vinegar 2 tbsp
Smoky flavor + heat: 1 dried chipotle chili (1 canned chili in chipotle sauce)
+ 1 tbsp olive oil to form an emulsion
Now, I entirely eyeballed the proportions of the marinade ingredients, and I would suggest tasting as you go along to find the right balance you like. In the end, the sauce was finger-licking good, way better than any store-bought BBQ sauce that I have tried.
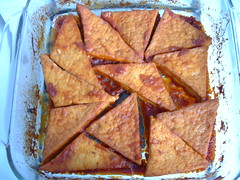
Baking the tofu: Place fried tofu in a baking dish and pour the marinade over it. Cover dish with a foil and bake at 350 degrees F for one hour, turning pieces half-way through baking. The 12 pieces of tofu fit snugly in one layer in a standard 9x9 baking dish:
Tofu Tangram, anyone?
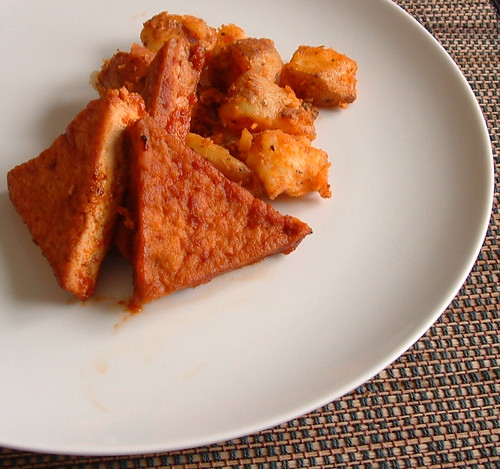
I served up the barbeque tofu with some smashed garlicky roasted potatoes (potatoes and garlic can be roasted in the same oven, while the tofu is baking). All in all, a delicious and off-beat Sunday lunch:
It was nice to start off the new year with some resolutions to eat and live better. But Alanna shares a cartoon depicting the resolution that beats all resolutions: Check it out!
Monday, January 01, 2007
Happy New Year 2007!
The table is set in anticipation of a year of meals big and small...
Wishing everyone a wonderful new year ahead! I hope 2007 brings abundance and joy to your table.
This is my entry for the January Centerpiece of the Month event: read about it here. It is a new event started by Janelle of Talk of Tomatoes.
This centerpiece: I bought two wine glasses back from the Czech Republic and found that they are actually too tall and unwieldy to be used to drink wine from. So here, I packed some daisies (stems trimmed short) into each and placed them on my tiny dining table as a fresh floral centerpiece. It brought some instant cheer to the room. One bunch of flowers is enough for two glasses.
The inspiration for tucking flowers into stemware came from an advertisement that I saw on the side of a bus in New York City, for this Margarita Bouquet.
These flowers lasted three whole weeks! I changed the water every 2-3 days and made sure that there were no leaves immersed in the water where they could decay. This helped keep this arrangement fresh for a long time.